FX Blue Publisher EA for MT5 - User guide
The MT5 Publisher EA is our recommended way of publishing your trading history from MT5 to FX Blue. Supports both netting and hedging accounts. Updates the website immediately on new trading activity. Highly configurable: set a start date, control which trades are published.
1Overview
FX Blue's Publisher EA is our recommended way of publishing MT5 trading histories to the www.fxblue.com website. The Publisher supports both netting-style and hedging-style accounts, and both the 32-bit and 64-bit versions of MT5
By default, the Publisher will update your trading results on the website every 5 minutes, or whenever you open or close a new position. You can change this behaviour and make publication more frequent using the EA's settings.
You can also use the settings to control options such as the following:
Don't publish open positions; only publish closed trades.
Set a delay before trades are published.
Set a start date for the publication (i.e. exclude trading activity before a set date).
Exclude particular instruments or MT5 magic numbers (trading systems)
2How to set up the FX Blue publisher for MT5
The FX Blue publisher consists of an EA which you need to add to any chart in MT5. The full installation instructions are as follows.
1. Run the setup program contained in the download from the website.
2. Choose which copies of MT5 to install the EA into, and click on "Install"
3. If MT5 is already running, restart MT5 (so that the new EA is included in the Navigator list).
4. Turn on the "Allow WebRequest" setting.
5. Open a new chart for any symbol.
6. Attach "FX Blue - Publisher" to the new chart (e.g. by double-clicking it in the Navigator list).
A single copy of the EA will publish all trades in MT5. You do not need to add the EA to a chart for each symbol which you trade.
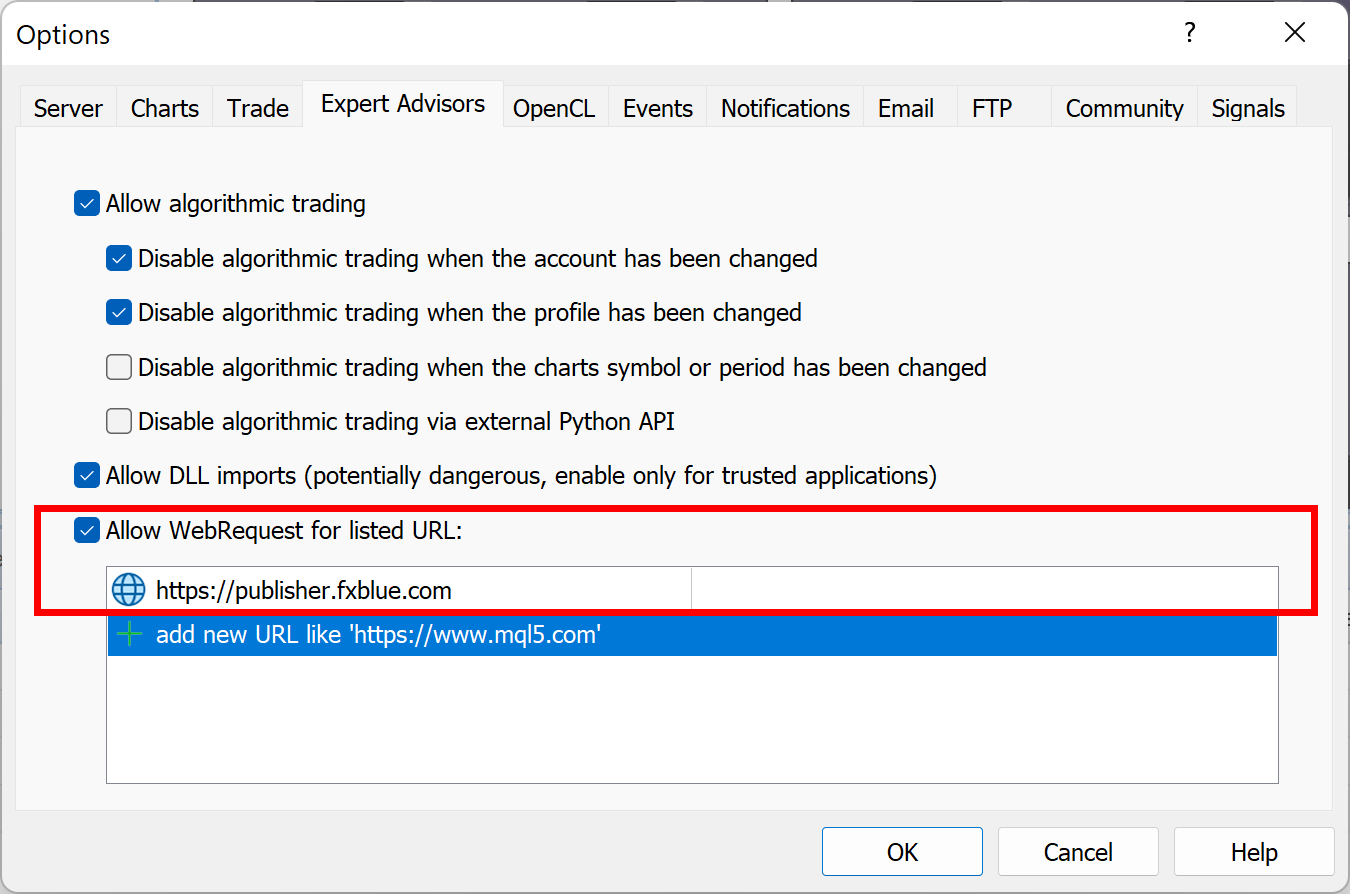
2.1Turn on the "Allow WebRequest" setting
You need to turn on the "Allow WebRequest" setting, giving the EA permission to send data to FX Blue.
- Choose Tools > Options from the MT5 menu
- Go to the Expert Advisors tab
- Turn on "Allow WebRequest"
- Add https://publisher.fxblue.com to the list of URLs
The settings should look like the highlighted area in the following screenshot:
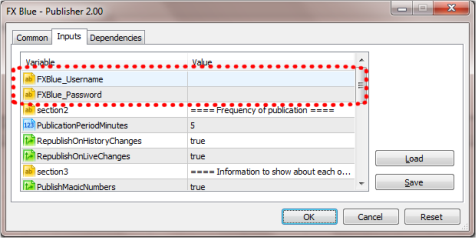
2.2Fill in your username and password
You need to fill in your FX Blue username and password on the "Inputs" tab of the EA's settings:
2.3Example of successful publication
Publication will start as soon as the EA is added to the chart.
The EA takes over the whole chart which you add it to, creating a blue background and display status information in the top left corner of the chart:
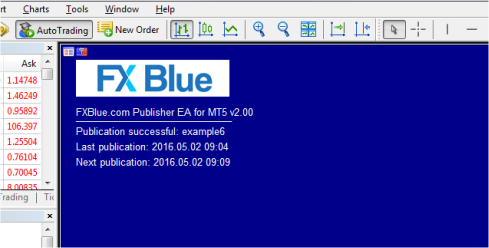
(The full-chart background is designed to reduce support queries from new MT5 users who otherwise try to run more than one EA on the same chart.)
3Publisher settings
The publisher EA has a number of settings which let you control what is published, and when. The only parameters which you must change are the FXBlue_Username and FXBlue_Password. All the other settings are optional.
Input name | Description |
FXBlue_Username | Your username for the FX Blue Live service - compulsory. |
FXBlue_Password | Your password for the FX Blue Live service - compulsory. |
Frequency of publication | |
PublicationPeriodMinutes | Number of minutes to wait between each publication to FX Blue. |
RepublishOnHistoryChanges | If turned on, the publisher may republish your account whenever your account history changes (e.g. an order is closed), without waiting for PublicationPeriodMinutes |
RepublishOnLiveChanges | If turned on, the publisher may republish your account whenever a new order is opened, without waiting for PublicationPeriodMinutes |
Information about each order | |
PublishMagicNumbers | Specifies whether or not to show the magic number of each order on your statement. FX Blue can only show analysis per EA if you turn this option on. |
PublishOrderComments | Specifies whether or not to show the comment associated with each order (i.e. the text set by an EA about the order). |
Choosing which orders to include | |
IncludeOpenOrders | Specifies whether or not to include open orders in the statement. |
IncludeOpenProfit | Specifies whether to include total floating P/L. If this setting is turned off, then IncludeOpenOrders is also treated as off. |
IncludePendingOrders | Specifies whether or not to include pending orders in the statement. |
IncludeIfOpenedSince | Specifies a start date for the statement. Orders are only included if they were opened after this time. N.B. Any filtering on your Account History list in MT5 also affects which orders are included. |
DelayTradeListByMinutes | Sets a delay on the statement: orders are not included until this number of minutes after they are opened. (The profitability of these orders will be included in the headline equity and balance, but the individual orders will not be listed.) |
OnlyIncludeSymbols | This setting is ignored if blank. Otherwise, it is treated as a comma-separated list of symbols to include in the publication. For example, the setting GBPUSD,EURUSD will exclude all trades which are not for either GBPUSD or EURUSD. Please note that the website will display a warning because this filtering can lead to discrepancies between the P/L in the trade history versus the current equity/balance. |
PublishBrokerName | If switched on, your broker name is displayed at the top of your published statement. |
ManualDeposit | If your broker has truncated your account history, cutting off the initial deposit, then you simulate the initial deposit using this value. Can also be used with IncludeIfOpenedSince when you are only publishing part of your trading history. |
Advanced settings | |
OverrideServerUrl | (Should be left blank unless required for diagnostic purposes) |
3.1Proxy servers
If you connect to the internet through a proxy server, you may need to configure these details. The Publisher EA uses Microsoft's WinHttp library which has its own proxy server settings, independent of everything else on the computer:
- Enter the proxy server details in the Internet Options section of the Windows Control Panel (or by choosing Tools/Internet Options in Internet Explorer). The proxy server details are entered using the "LAN settings" button on the "Connections" tab.
- Run the following command, e.g. by clicking on the Windows Start button and then typing in the command: proxycfg -u